Friday, 23 December 2016


Santa Baby ...


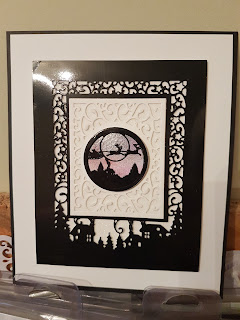
OMG!!!! I loved colouring this one in, again using Lisa Horton's Christmas stamps and my Harmony Markers.

Both layers are coconut white and ruby foundation card, the red gems I found in my stash and couldn't resist a little bling.

To be honest I wanted to leave this one simple and let the design and colouring stand out.

Definitely one of my favourites now I'm looking forward to next Christmas so i can bring this out again.

Hope you like it.

I will be posting again in the New Year. Merry Christmas and all the very best for the coming year.

xx

Wednesday, 21 December 2016


A Funky Noel ...


For this one i coloured in the Noel stamp with the Harmony Alcohol markers in varying shades of blues/blue greens. I mounted this onto a piece of cobalt foundation card. 

I cut a similar shaded piece of pixie powdered paper as a large mount and then a double matt of coconut white and cobalt.

I added the swirling stars die on the bottom corner, this was dipped into the pixie powder before it dried. I cut out varying sized snowflakes in coconut white and cobalt and layered these together in the top corner.

I finished by adding sparkling gems in the corners of the centre piece.

Hope you like it

xx

Monday, 19 December 2016


HO HO HO .... Oops


I used to love colouring in and thought id have another go.

I just love the Christmas stamps designed by Lisa Horton, having seen her stamps and the samples she had coloured in I was inspired to have a go.

For this one I used two stamps separately. I have the Harmony Alcohol markers and I must say I don't think this is too bad for my first try.

I mounted the finished pieces on different coloured mounted and then on to a larger piece of pixie powdered paper, which in turn is mounted on to another matt from the pierced rectangles set, which i went around the edges with gilding polish and then finally onto a large black matt.

Hope you like it
xx

Wednesday, 14 December 2016

Celebrate 


For this one i tried a colour i dont usually use. Spearmint Green with Cobalt and Milk.

I wanted to try out the Nasturtium die with some pixie powder paper and for some reason, the Beverley Hills die from the California collection caught my eye. Hence the centre piece.

A bit of a masculine card but i think it works

Finished size 7" square

Hope you like it

xx


Monday, 12 December 2016


Christmas but not ...


I thought it was time i used my Exquisite Poppies, These are fast becoming a favourite.

This one is a christmas card without a festive twist. I chose Raspberry and milk as my main colours. I cut the first piece as a 5" x 5" blank and stamped this gorgeous swirly stamp to die for. I restamped the centre and added a christmas greeting and cut out the centre by hand a raised it up. I added a few matts and layers to set the design off.

I cut varying sized poppies out of some pixie powdered paper and layered and shaped them and added a pearl to the centre of each of the flowers and set three of them off with a matching bow, with two small one in the top corner and finally added pearls in the corners. Not my usual colours but these pixie powders take you to another level.

Hope you like it

xx

Friday, 9 December 2016

Christmas Starry Sentiment


My Last batch card.... This one i did in a variety of colours, this one is done in teal and the one in the background was done in ruby.

I started with a 6" x 6" card blank, I cut matching sized coloured card and embossed it, for the teal one, starry night but I used all the snowflake folders, my favourites.

I covered some white card with Enchanted gold gilding polish and cut out a snowflake border and Merry Christmas &a Happy New Year for each card i made.

I Hope you like it

xx

Wednesday, 7 December 2016

Peace Joy Love ...


Another batch card, do'nt worry only one more to go. LOL !

For this one i started with a 7" x 7" square card blank. I used the poinsettia die and cut two layers out of ruby card to make each flower, finishing each one with a red gem for the centre. 

I cut some pine twigs and holly leaves to finish of the corner design in brunswick green.

I cut the centre out of the nobel ornate pierced design set and stamped by sentiment ... Peace Love Joy.

I mounted the sentiment and layered the flowers and foliage around it.

Hope you like it

xx

Friday, 18 November 2016


Christmas Angel ...


For this one i started with a 6 x 6 inch card blank. I cut a matching piece out of of cream cardstock and embossed it with frosty swirls. I used gilding polish to enhance the embossing.

I cut out 5 stars that are in the same set as the 2015 Angel and mounted these in foam pads around the angel. I cut out the angel from some pixie powdered paper and added multi-hued gems in the centre of each star on the angel.

Finally I stamped a sentiment.

Hope you like it

xx

Wednesday, 16 November 2016

Pixie nativity..


Another batch card, nearly all done lol.

Again i used the starry background but this time mounted onto a piece of Teal foundation cardstock.

I cut the creative expressions nativity die out of coconut white and layered it over some watercoloured pixie powdered card.

I used the midnight blue, rich gold and aqua lagoon.

Hope you like it

xx

Monday, 14 November 2016

Starry Nativity


Apologies that Ive been AWOL. Schedule didnt work and i hadnt noticed.

More batch cards. This one is a simple batch card, that needs no sentiment.

The background is the starry night die, mounted on platinum foundation card both from creative expressions. The Nativity scene is a crafters companion die.

Together they simply give the message, of what the up coming festive season is all about

Hope you like it

xx

Friday, 4 November 2016

Mistletoe Kisses....


Another Lilly of the valley Christmas stamp. I have really enjoyed colouring these in. This one is mounted onto a 6" x 6" card base.

I have made the frame out of teal pearlised card from my stash, to match the colours i have used on their hats, scarves and jackets. I have embossed the frame with the holly swirls embossing folder.

Hope you like it

xx

Wednesday, 2 November 2016


Crackers.....


Slightly different but on the same theme as my last post.

For this one I used a different stamp from the same Lilly of the Valley christmas range and coloured it in with my alcohol markers,

I mounted it on to a 7" x 5" card blank. The base layer is coconut white card embossed with the Let it Snow embossing folder. I used some light blue pearlised card from my stash for the frame. This was cut out from the Nobel dies. The  sentiment is from the just-rite stamp set.

Hope you like it
xx

Monday, 31 October 2016

Something a little different this week...HC


This week I found some old Lilly of the Valley stamps and thought id try out my alcohol markers. I must say I'm quite pleased with the results.

This is the first of the three stamps i have, this one is mounted on a 6" x 6" card blank. I framed the image with some cream coloured pearlised card from my stash, which i embossed with the snowflake lattice embossing folder.

Hope you like it

xx


Friday, 21 October 2016


Navity with a twist


Had to get the pixie powders in the mix again. I have chosen a 5" x 7" card blank for this one.

I started with the ray of light die and cut it out using some dark blue pearlised card from my stash, leaving a border around the edges. I cut the same size out of some pixie powdered background made using midnight blue, pewter and aqua lagoon.

I mounted the background on to the card blank, leaving a small border to frame the design.

I cut out the navitiy die in the same blue and the topper in Coconut white. I cut out the starry Merry Christmas in white and mounted the two in opposite corners.

Hope you like it
xx

Wednesday, 19 October 2016

Snowflakes & Baubles 


For this design i chose to use Platinum and Coconut white card. I started with a 7" x 7" card blank.

I cut a piece of platinum card the same size as the card blank and then cut a slightly smaller piece in Coconut white. I embossed the Coconut white with the snowflake embossing folder.

I stamped and cut out the smaller bauble with the snowflake bauble stamp and cut out the bauble topper and hanging frame. I also cut out the snowflake Merry Christmas sentiment.

Finally i added a few gems on the bauble and sentiment and a few larger one to the corners

Hope you like it
xx

Monday, 17 October 2016

A little festive ...


A simple festive card....

I have used two colours, Brunswick green and Coconut white. I started with a 5" x 7 " card blank and cut out a slightly smaller piece of Brunswick Green and rounded the edges.

I used two dies from the noble die set to make the frame. I also cut another blank the same size, without the aperture this time. I embossed this with the snowflake lattice embossing folder.

I stamped seasons greetings across the bottom of the frame, from John Lockwood's festive stamp set. I lined the frame with the embossed blank and raised the frame for depth to the design.

I cut two festive trees in Brunswick green and glued them together. I set this in the middle of the frame and added a gem to the star at the top of the tree.

Hope you like it

xx


Friday, 14 October 2016


Black & Gold Bauble ...


For this one i started with a 7 x 7 inch card blank.

I cut out black, gold and milk layer as the base of my design. I embossed the top layer with star swirls embossing folder.

I cut out the large bauble in black and gold, three times and layered them together to give a 3d effect.


I finished the design of by cutting a black & gold starry Merry Christmas and slightly off set them to give a shadowed effect.

Hope you like it

xx


Wednesday, 12 October 2016

 Let it snow....


Another batch card. Again i started with a card blank 8 x 8 inches.

For this one I used the Ruby red card and Coconut white. I cut the snowflake border and snowflake topper in Ruby red. I stamped the sentiment Let it Snow from a justrite set of festive sentiments.

I cut the oval topper from the Austrian die collection - Salzburg die.


The back ground is using the snowflake swirl embossing folder, matted and layered it in to a Ruby red base.

Hope you like it

xx

Tuesday, 11 October 2016

Simply Christmas


Sorry its late, got my days mixed up..... 

Im starting my batch cards for Christmas, here's the first one. Unusually for me I started with a card blank of 5 x 7 inches.

I started with a piece of blank card and used the starry night die and cut it twice, rotating it 90 degrees to extend the pattern. I cut the finished piece to leave a small border .

I cut two branches from the pine bough set of dies and layered them together.

I cut both layers of the small bauble on in coconut white the other in ruby and layered them together,

Finally i cut the starry Merry Christmas in coconut white.

I add some ribbon to give the effect of the bauble hanging of the branch. 

Simple & easy to change the bauble colour to make a batch

Hope you like it

xx


Friday, 7 October 2016

Star swirls ...


Again ive been playing with pixie powders, there is no end of creativity with this product.

For this one i used Lava Red, Aqua Lagoon and pewter. I embossed the copy i took with the foundation card, with the eternity embossing folder and used the metallic gilding polish in pearl lustre to enhance the emboss.

I cut out a frame using the largest and third largest pierced rectangle dies. i covered this with the same gilding polish. I cut the embossed pixie powdered background slightly bigger than the frame. I raised the frame with foam mounting tape to add dimension.

From the scraps of the water colour card in the same colour i cut out two star swirl, being careful to keep the all the stars in tack. I placed these across the corners mounting the middle stars to keep it level.

I added a sentiment again i covered the card in pearl lustre gilding polish and added a final mount in plum

Finished size 7.5 x 8.5 inches

Hope you like it

xx


Wednesday, 5 October 2016


Triple striplet..


For this design i used Brunswick green, Spearmint green and Lavender.

I used the Ravello die to make the background in spearmint green, I lined it up and cut it vertically and horizontally. I mounted it onto a pixie powder background. I used Lava red, Aqua Lagoon and pewter. With the leftover i cut out a topper so i could stamp my sentiment. I mounted this on to Toronto from the Canadian collection using Brunswick green card.

I cut out varying sizes of camellias and arranged them over some laurel leaves, to finish i added pearls to the centre of each flower and in the corners of the lavender layer

I mounted the main design on to Lavender, then Brunswick green.

Finished size 8.25 x 8.25 inches

Hope you like it

xx

Monday, 3 October 2016


Let it Snow....


For this design i chose two colours, coconut white and deep blue.

I cut out four snowflakes in blue and white and put the two layers together rotating the top one. 

I cut let it snow out using the same two colours and put them together to give a shadow effect.

I made the background out of a piece of coconut white card, a mask and some texture paste.

I cut a frame out, using the nobel die, after placing the background behind the frame i matted this on to a piece of deep blue card,

Finally i added a matt and layer of coconut white and deep blue using the pierced rectangle dies and added gems to the corners

Finished size 7.5 x 6.5 inches

Hope you like it
xx 

Wednesday, 28 September 2016


The Holly & the Ivy...


For this deign i started off with some colour cloud - Basil Leaf on coconut white, i cut out two  of each of the ivy dies from the finishing touches collection of dies. I cut two of each of the holly sprays in brunswick green. I entwined these two together and held them in place with cosmic shimmer glue.

I made three itty bitty bows using Rich Red card, i used both the classic bow and filigree bow and layered them together. I made the same bow using the full size die.

Whilst waiting for these to dry I made the final matt and layers in coconut white and rich red. I used john lockwoods stamps .. the holly and the ivy on each side and added a flourish in each corner.

I layered the holly and ivy into a wreath shape and added the bows. I cut out two pairs of filigree holly and added pva berries. Whilst waiting for this to dry I stamped ... the holly & ivy and  shaded holly leaves in a circular shape in the centre. I added the holly to centre of the design.

Finished design 8 x 8 inches

Hope you like it

xx


Monday, 26 September 2016


Diamond Wedding Anniversary


My other time challenged designed.....

Again i started with an 8 x 8 inch card blank and added a matt and layer in Milk and Chestnut.

I used tonal yellow/orange shades of colour cloud and blended them from the sun light to dark to the outside edge. I cut out the ray of light die in Milk in a piece of card slightly larger than the die to give a border. I matted this on to a layer of chestnut card.

I cut out some ivy and coloured in Basil leaf colour cloud ink. I placed these in the bottom corner and added varying colours of Daisies, Cornflowers and Daisies. To finish the flowers i added a pearl to the centre of each.

Hope you like it

xx

Friday, 23 September 2016


Happy Birthday Auntie Mary xx


For this design i wanted something special for my favourite Auntie
so i went with hand coloured stamped topper. These roses match the french collection of dies. Auntie Mary loves yellow roses, hence the colour. i used my alcohol pens and shaded the roses i mounted the finished piece on to a plum mat and then a double matt of milk and plum, each layer cut from the french collection. I also added a sentiment into the blank area. 

I cut two layers to mount my finished centre piece. For the smaller layer i embossed the milk piece with the eternal ivy embossing folder and then mounted it, onto another piece of plum card and then on to a plain matt and layer.

I added a purple ribbon bow as this is her favourite colour..... and mine.

Finished design 8 x 8 inches

She loved it.... Hope you do too

xx

Wednesday, 21 September 2016

Nobel Piercing


I thought I would try something new and found it to be quite therapeutic.... Paper piercing

I started with the Nobel Square die, Ornate Pierced Squares. I cut out the frame and centre in coconut white. I cut out the borders in Cobalt, Deep Navy and Periwinkle and place them to give the pattern shown above.I added blue crystals to the second layer.

I stamped a sentiment on the top layer from Sue Wilson's sentiment stamps. I put the layers together and mounted on a cobalt and periwinkle matt.

Finished Design 7 x 7inches

Hope you like it

xx

Monday, 19 September 2016


Diamond Wedding Anniversary


My other time challenged designed.....

Again i started with an 8 x 8 inch card blank and added a matt and layer in Milk and Chestnut.

I used tonal yellow/orange shades of colour cloud and blended them from the sun light to dark to the outside edge. I cut out the ray of light die in Milk in a piece of card slightly larger than the die to give a border. I matted this on to a layer of chestnut card.

I cut out some ivy and coloured in Basil leaf colour cloud ink. I placed these in the bottom corner and added varying colours of Daisies, Cornflowers and Daisies. To finish the flowers i added a pearl to the centre of each.

Hope you like it

xx

Friday, 16 September 2016

90th Birthday


For this one I didn't have a lot of time, one & a half hours from request to delivery (and the next one Diamond Wedding)

For the background i used some pixie powders. I cut a piece of plum card slightly bigger than the French Background die. Once cut out i mounted one over the other.

I cut out some ivy and coloured with colour cloud. I cut out different coloured daisies, cornflowers and camellias and layered them together after adding pearls to the centre of each flower.

I used a 8 x 8 inch card and added a matt of Coconut white and plum card to finish off the design.

Hope you like it

xx

Wednesday, 14 September 2016


Best Friends


For this design i used the Canadian Die - Vancouver. I cut it five times in Deep Blue, Periwinkle and Coconut White. I snipped various parts away to give it a layered look to show off different parts of the design.

On the top layer i stamped a verse from the just rite Friendship vintage Labels 7.

I added a double matt and layer of Coconut White and Cobalt to frame the design.

Finished Design 7 x 7 inches

Hope you like it

xx

Monday, 12 September 2016

Merry Christmas


I know its early but thought it was time to add a few dare i say.... Christmas designs in.

Another Pixie powder background, with snowflake background die cut out of Black Gloss card, leaving a border around the edge and leaving the centre open to show the detail of the pixie  powders.

I mounted this on to a double mount of Blush and Black card. On the outer layer at the base of the design i stamped Merry Christmas from Johns Lockwoods stamp set.

I cut out santas sleigh from black gloss card and embossed it to show the detail of this die and mounted this over the centre.

Finished size 8.25 x 6.5 inches

Hope you like it

xx

Friday, 9 September 2016


A little bit different ...


I thought i try a colour combination i haven't tried before. Teal and Custard which i hope you like.

I used the Diagonal die lavish swirls die and cut out the top layer. I mounted this on to a matt of teal to show off the detail of the die. Using the same colour combination i used the Oslo die from the Scandinavian collection and cut out all the layers and made the centre piece to show all the beautiful detail.

Using the camelia die i cut out varying sizes and made a double flower and placed a pearl in the centre of each one and placed them each corner and one in the centre of the main focal piece to finish the design.

Finished size 7.5 x 9 inches

Hope you like it

xx


Wednesday, 7 September 2016

Butterflies


A simple design using two colour of card and two colours of colour cloud.

For the background i used Natural Rosewood and Rose Blush and shaded light to dark towards to outside rays. I die cut the ray of light die leaving a small border in Blush and mounted this over the colour cloud background. With some of the remaining background i cut out 5 small butterflies.

I mounted this on to Rich plum and them on to a double matt of blush and rich plum and added three small pearls to each corner on the outer matt.

Finished size 6.25 x 8.25 inches

Hope you like it

xx

Monday, 5 September 2016

Friends.....


I thought it was time to try something a little different.

For this card i used two colours, Coconut white and Rich Red.

I cut out the Rose garden striplet a couple of times and layered together. I used cosmic shimmer pva glue and coloured in the roses. I cut out the striplet in green and pieced the pieces back for the leaves. I mounted it onto a matt of rich red card.

For the next matt I embossed the white card using the knotted trellis embossing folder and mounted it on to a matching rich red matt. I made a further matt of white and red and mounted both layers. I stamped a sentiment and cut it out using the centre of the nobel dies

I added red gems to the corners of the top and base layer

Finished size 8.25 x 8.25 inches

Hope you like it

xx

Friday, 2 September 2016


Santa Scene


For this design i chose a simple black and white theme. I cut out the santa scene in black gloss card and mounted it over white card, that was covered in diamond sprinkles. For the next layer i cut the topper out of coconut white and cut a matching piece again in coconut white and covered this in diamond sprinlkles. For the topper i used black gloss card and mounted this over a piece of water colour card sprinkled with pixie powders to give the look of the northern lights sky.

I added a simple but large matt of black and white card

Finished size 6.75 x 8.25

Hope you like it

xx