Wednesday 28 September 2016


The Holly & the Ivy...


For this deign i started off with some colour cloud - Basil Leaf on coconut white, i cut out two  of each of the ivy dies from the finishing touches collection of dies. I cut two of each of the holly sprays in brunswick green. I entwined these two together and held them in place with cosmic shimmer glue.

I made three itty bitty bows using Rich Red card, i used both the classic bow and filigree bow and layered them together. I made the same bow using the full size die.

Whilst waiting for these to dry I made the final matt and layers in coconut white and rich red. I used john lockwoods stamps .. the holly and the ivy on each side and added a flourish in each corner.

I layered the holly and ivy into a wreath shape and added the bows. I cut out two pairs of filigree holly and added pva berries. Whilst waiting for this to dry I stamped ... the holly & ivy and  shaded holly leaves in a circular shape in the centre. I added the holly to centre of the design.

Finished design 8 x 8 inches

Hope you like it

xx


Monday 26 September 2016


Diamond Wedding Anniversary


My other time challenged designed.....

Again i started with an 8 x 8 inch card blank and added a matt and layer in Milk and Chestnut.

I used tonal yellow/orange shades of colour cloud and blended them from the sun light to dark to the outside edge. I cut out the ray of light die in Milk in a piece of card slightly larger than the die to give a border. I matted this on to a layer of chestnut card.

I cut out some ivy and coloured in Basil leaf colour cloud ink. I placed these in the bottom corner and added varying colours of Daisies, Cornflowers and Daisies. To finish the flowers i added a pearl to the centre of each.

Hope you like it

xx

Friday 23 September 2016


Happy Birthday Auntie Mary xx


For this design i wanted something special for my favourite Auntie
so i went with hand coloured stamped topper. These roses match the french collection of dies. Auntie Mary loves yellow roses, hence the colour. i used my alcohol pens and shaded the roses i mounted the finished piece on to a plum mat and then a double matt of milk and plum, each layer cut from the french collection. I also added a sentiment into the blank area. 

I cut two layers to mount my finished centre piece. For the smaller layer i embossed the milk piece with the eternal ivy embossing folder and then mounted it, onto another piece of plum card and then on to a plain matt and layer.

I added a purple ribbon bow as this is her favourite colour..... and mine.

Finished design 8 x 8 inches

She loved it.... Hope you do too

xx

Wednesday 21 September 2016

Nobel Piercing


I thought I would try something new and found it to be quite therapeutic.... Paper piercing

I started with the Nobel Square die, Ornate Pierced Squares. I cut out the frame and centre in coconut white. I cut out the borders in Cobalt, Deep Navy and Periwinkle and place them to give the pattern shown above.I added blue crystals to the second layer.

I stamped a sentiment on the top layer from Sue Wilson's sentiment stamps. I put the layers together and mounted on a cobalt and periwinkle matt.

Finished Design 7 x 7inches

Hope you like it

xx

Monday 19 September 2016


Diamond Wedding Anniversary


My other time challenged designed.....

Again i started with an 8 x 8 inch card blank and added a matt and layer in Milk and Chestnut.

I used tonal yellow/orange shades of colour cloud and blended them from the sun light to dark to the outside edge. I cut out the ray of light die in Milk in a piece of card slightly larger than the die to give a border. I matted this on to a layer of chestnut card.

I cut out some ivy and coloured in Basil leaf colour cloud ink. I placed these in the bottom corner and added varying colours of Daisies, Cornflowers and Daisies. To finish the flowers i added a pearl to the centre of each.

Hope you like it

xx

Friday 16 September 2016

90th Birthday


For this one I didn't have a lot of time, one & a half hours from request to delivery (and the next one Diamond Wedding)

For the background i used some pixie powders. I cut a piece of plum card slightly bigger than the French Background die. Once cut out i mounted one over the other.

I cut out some ivy and coloured with colour cloud. I cut out different coloured daisies, cornflowers and camellias and layered them together after adding pearls to the centre of each flower.

I used a 8 x 8 inch card and added a matt of Coconut white and plum card to finish off the design.

Hope you like it

xx

Wednesday 14 September 2016


Best Friends


For this design i used the Canadian Die - Vancouver. I cut it five times in Deep Blue, Periwinkle and Coconut White. I snipped various parts away to give it a layered look to show off different parts of the design.

On the top layer i stamped a verse from the just rite Friendship vintage Labels 7.

I added a double matt and layer of Coconut White and Cobalt to frame the design.

Finished Design 7 x 7 inches

Hope you like it

xx

Monday 12 September 2016

Merry Christmas


I know its early but thought it was time to add a few dare i say.... Christmas designs in.

Another Pixie powder background, with snowflake background die cut out of Black Gloss card, leaving a border around the edge and leaving the centre open to show the detail of the pixie  powders.

I mounted this on to a double mount of Blush and Black card. On the outer layer at the base of the design i stamped Merry Christmas from Johns Lockwoods stamp set.

I cut out santas sleigh from black gloss card and embossed it to show the detail of this die and mounted this over the centre.

Finished size 8.25 x 6.5 inches

Hope you like it

xx

Friday 9 September 2016


A little bit different ...


I thought i try a colour combination i haven't tried before. Teal and Custard which i hope you like.

I used the Diagonal die lavish swirls die and cut out the top layer. I mounted this on to a matt of teal to show off the detail of the die. Using the same colour combination i used the Oslo die from the Scandinavian collection and cut out all the layers and made the centre piece to show all the beautiful detail.

Using the camelia die i cut out varying sizes and made a double flower and placed a pearl in the centre of each one and placed them each corner and one in the centre of the main focal piece to finish the design.

Finished size 7.5 x 9 inches

Hope you like it

xx


Wednesday 7 September 2016

Butterflies


A simple design using two colour of card and two colours of colour cloud.

For the background i used Natural Rosewood and Rose Blush and shaded light to dark towards to outside rays. I die cut the ray of light die leaving a small border in Blush and mounted this over the colour cloud background. With some of the remaining background i cut out 5 small butterflies.

I mounted this on to Rich plum and them on to a double matt of blush and rich plum and added three small pearls to each corner on the outer matt.

Finished size 6.25 x 8.25 inches

Hope you like it

xx

Monday 5 September 2016

Friends.....


I thought it was time to try something a little different.

For this card i used two colours, Coconut white and Rich Red.

I cut out the Rose garden striplet a couple of times and layered together. I used cosmic shimmer pva glue and coloured in the roses. I cut out the striplet in green and pieced the pieces back for the leaves. I mounted it onto a matt of rich red card.

For the next matt I embossed the white card using the knotted trellis embossing folder and mounted it on to a matching rich red matt. I made a further matt of white and red and mounted both layers. I stamped a sentiment and cut it out using the centre of the nobel dies

I added red gems to the corners of the top and base layer

Finished size 8.25 x 8.25 inches

Hope you like it

xx

Friday 2 September 2016


Santa Scene


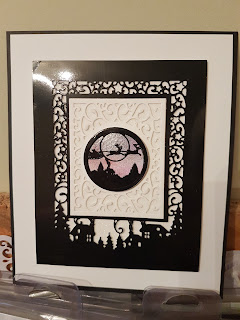
For this design i chose a simple black and white theme. I cut out the santa scene in black gloss card and mounted it over white card, that was covered in diamond sprinkles. For the next layer i cut the topper out of coconut white and cut a matching piece again in coconut white and covered this in diamond sprinlkles. For the topper i used black gloss card and mounted this over a piece of water colour card sprinkled with pixie powders to give the look of the northern lights sky.

I added a simple but large matt of black and white card

Finished size 6.75 x 8.25

Hope you like it

xx