Friday 29 July 2016


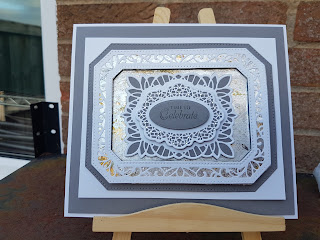
Silver & Grey Time to Celebrate ...


Time for a bit on shimmer, I just had to do a design using Gilding Flakes, one of my favourite mediums to use.

For this design used the Nobel Dies from the Ornate Pierced range. I cut the border out and applied Silver Moon Gilding Flakes on the bottom layer. I cut out a base layer and covered it in a sticky sheet then put gilding flakes over and polished off any excess.

For the central design i used the Toronto Die from the Canadian range  in Slate grey and Coconut White. On the second layer i added clear crystals and the top layer i added the sentiment Time to Celebrate stamped using Watering Can Archival ink, then mounted in the centre of the Nobel Frame.

I added a layer of Coconut White to accentuate the shapes of the Shape of the centre piece. I added a simple double border to finish the design

Finished size 8"x 7"

Hope you like it

Terri


Wednesday 27 July 2016

You are so Thoughtful...


For this design i chose to use Brunswick Green and Milk.

I used the Vancouver die from the Canada Collection and cut out matching layers. Once layered together i added small pearls to the bottom layer.

I used the just-rite stamp range of sentiment dies and stamped you are so thoughtful in Archival watering can.

On the first layer i used the Gemini die - Pavo, mounting it on the brunswick green to show off the design. I added this to a double matt and layer of brunswick green and milk, to which i added large pearls around all  the borders

Finished size 7.75" square

Monday 25 July 2016


Thinking of you


For this design i chose three tonal colours, Custard, Milk and Vintage Gold.

I used three dies from the Pierced rectangles for the three layers, the top layer was embossed using the Eternity embossing folder.

I chose the milk and custard and cut out layers using Porto die from the Portugal Range. Once layered i added clear gems to accentuate the pattern

I added a clear gem to the centre of each swirl and a ribbon border (from my stash) & double bow to finish the design.

Finishing size 7" x 8"

Hope you like it

Terri

Friday 22 July 2016


Enjoy


For this one i chose four colours from the Foundation card stock - Milk, Custard, Vintage Gold and Black.

I cut out two Enjoy and layered them together to give a bolder look.

I cut out varying sizes of perfect peonies from both the complete and open petals, using the black and custard card stock once assembled i added black pearls to the centres.

I also cut out Delicate Fronds in Milk and Star Sprays in vintage gold.

Using the top layer I used the Striplet die - Quilted Blocks. I cut this out along one edge, then rotated it 90 degrees and re cut. This is mounted over a layer of iced snow, then mounted on black card for the first mount.  I added another double layer then single mount, with black pearls on the corner of each layer.

Finished size 8" x 8"

Hope you like it

Terri

Wednesday 20 July 2016


You deserve to soar...


For this design i chose to use two colours, Coconut White and Heather. I cut out three silhouettes of butterflies from the Finishing Touches collection. I stamped the Arched Swirls and coloured in with toning colours using alcohol markers. I lined them up so each butterfly has the same design showing through.

I cut some trailing ivy and a centre die from the Austria Salzburg die in Heather and set it on Coconut white to emphasize the dies design.

I used John Lockwood's Butterfly dreams stamps set to add the sentiment.

I added matching matt and layers and then added pearls in the corners of each layer.

Finished size 7.75" square

Hope you like it

Terri

Monday 18 July 2016

Simple Scandinavian


For this simple design i chose two colours from the Foundation cardstock colour range, Amethyst and Milk.

I started by cutting the largest decorative die out of the Stockholm die from the Scandinavian Collection out of the top layer, then the two layers out of smaller pieces to mat and layer. I added pearls around the oval in the centre of the top layer. 

I cut out 4 charming hearts corners and cut them down so the corner is now symmetrical. I made up one large, two medium and 6 small camellia flowers with pearls in the centre and layered them over the border from the filigree bow die set.

I added a matching layer with pearls in the corner to set the design off

Finished size 8" x 8.75"


Hope you like it

Terri